RoboRacer Rules
Overview - Winning - Chips and Phases - Deck - Damage - Virtuality - Virtual Burn - Rebooting - Spawning - Elements - Priority - Phase Steps - Bot Modules - Time Limits - Chat CommandsOverview
RoboRacer is a turn-based race & battle game for 1 or more players. Players create movement programs for their robots in an attempt to be either the first to complete a race course or be the last bot left alive. Movement programs are specified by a sequence of 5 chips created from a hand of 9 chips (or fewer for damaged robots). The game is turn based - it waits for all players to enter their movement program for the current turn before proceeding. When the turn executes all movement programs are executed simultaneously. Bots may interfere with each other by shooting or pushing each other - so to do well at the game, players need to predict their opponents movements and find programs which best handle the possible interaction with their opponents.Games generally advance a turn or two per day, depending on the speed and availability of the players involved. "Real-time" games can also be played when all players are online at the same time, allowing a full game to be played in one sitting.
Getting Started
Getting StartedTournaments
Tournament RulesPyramid
PyramidCourse Builder
Course BuilderRace Games
Most RoboRacer games are races. Race games are won by either the first bot to complete the course, or the last bot left alive. To complete the course, a bot must tag each check point in order.Arena
Courses with no check points are called arenas. The last surviving bot wins an arena game. In arena games bots may not reboot. Any time a bot dies in an arena game its remains are dropped in the square where the bot dies plus the eight surrounding squares, which can be collected for rewards. See the Arena Remains section for more details.Puzzles
Robo Puzzles are special courses designed to be puzzles solved by a single player, or a group of players working together.Team Play
Team play is a race between two teams of two or more bots. At the start of the game, all bots are assigned to either the Blue Team or the Orange Team. The winning team is the team which has any single bot complete the course first, or the last team left alive.Winning
There are two ways to win:- Be the first bot to reach all Check Points in order
- Be the only Bot alive (If no bot reaches all check point).
Chips and Phases
Each turn, each player receives a set of chips with which to create a 5-chip program (placed in the green box - bottom row of the chips). Once all programs have been submitted, the bots execute their 5 chips in 5 phases of the turn.The different program chips are to move forward 1-3 spaces, back a space, or rotate.


Deck
At the start of each turn, a fresh 84 chip deck is shuffled with the following counts:- 18 each:
- 12 each:
- 6 each:
If the deck runs out during the turn and another chip is needed, a new 84 chip deck is shuffled. Cards locked in place by damage are not withheld from the deck.
Damage
During play, bots can become damaged. At the start of a turn, each player receives nine chips minus one for each point of damage. A bot with more than 4 points of damage will have the last 1-5 chips (depending on the amount of damage) of its program frozen in place from the chips executed on the previous turn.If a bot reaches 10 points of damage, it is destroyed.
Virtuality
Newly spawned bots start out Virtual. Virtual bots can not use their lasers or be shot. They can move through other bots instead of pushing or being pushed. They are still affected by all board elements, such as pushers, belts and turntables (not wall blasters or repellers). At the end of a turn, any Virtual bot which does not share its location with another bot turns Real. A Virtual bot which ends its turn at the same location as another virtual bot takes 1 point of Virtual Burn damage and remains Virtual for the next turn.- Examples and/or FAQ:
- A live bot is always either "virtual", or "real".
- A virtual bot does not fire lasers, and can not push other bots or be pushed by other bots.
- A virtual bot can move onto or through another bot.
- How to become virtual
- A newly spawned bot begins virtual.
- A bot becomes virtual when it uses a teleporter if the destination is occupied by a real bot.
- A bot can become virtual through the use of a virtualizer module.
- A virtualizer element virtualizes bots at its location.
- How to become real
- A virtual bot becomes real if it ends a turn on a space with no other bots.
- A bot can become real through the use of a virtualizer module.
Virtual Burn
- A virtual bot takes a point of damage if it ends a turn at the same location as another virtual bot.
 Radiation is created wherever virtual burn takes place. Locations that start the turn with radiation disable rebooting for all bots at that location, and virtual bots are not repaired by course elements at that location. Radiation is virtual and is not affected by course elements.
Rebooting
A player chooses to reboot by activating the reboot button before submitting a move. The bot will execute its current turn as normal, will be completely repaired just before the end of the turn, and will be inactive (playing five "0" chips) for the next turn.Rebooting is not possible in arena games.
- A GREEN button means the bot will play the next turn
- A RED button means the bot will reboot during the next turn
 |
| Activated reboot button |
Spawning
A bot will store its position (location and heading) each time it tags the next Check Point. Future lives will start from that position until the bot tags the next Check Point.New bots will be deployed with a safe mix of chips: At least three turn chips including at least one R or L, and at least 3 move chips including at least one 2 or 3.
Elements
Element Index
Floor


Standard floor tiles.
Pit

Bots moving into pits or off the edge of the course die immediately.
Start

The starting point at the start of the game, and initial saved starting point. The initial starting direction is defined by the course's designer.
Repairs


A damaged bot ending a turn on these tiles gets one or two points of damage repaired.
Screen


A bot may pass over these squares. However, ending a phase on a screen results in death.
Damaged Tile

When a damaged tile starts a phase with something on it and ends the phase with nothing on it, the tile breaks and it becomes a screen.
Receptacle

Receptacles are holes which can be filled. The first bot (or other object) that moves onto a receptacle falls to its death, and fills the receptacle.

A covered receptacle is safe. It works as a normal floor tile.
Rails


A bot is "on the rail" if it is facing in a direction that the rail leaves the tile.
Bots "on the rail" are influenced by the rails in the following ways:
Any turn chip will instead execute a move-1 (not affected by doubler or inverter). If that move-1 fails to move the bot, the bot will "jump the track" and execute the turn chip.
On the cross rail, turns always work as move-1's when it's possible to move forward. On the horizontal rails and vertical rails, turns work as normal if the bot is not facing the same direction as the rail. (Left/Right, or Up/Down)
Corner Rails

Moving frontwards onto a curved rail (by move, push, belt, etc) from one of the railed sides will turn you to face the other railed side. Moving backwards (or sideways) onto a rail will not result in a turn. (A "railed side" is one of the two sides of the tile where the rail goes.)
- When on a rail tile:
- If your front is not facing a railed side, all chips are unaffected by the rail.
- If your front is facing a railed side:
- Any turn chip will instead execute a move-1 (not affected by doubler or inverter). If that move-1 does not move you, the LRU also operates normally. (The same as straight rails.)
- A forward move or push, or a sideways push, works normally.
- A backward move (reverse chip, or pushed) rotates you so your back faces the other railed side, then moves moves you back 1.
Rails Over Pits


A bot attempting to move on or off of these rails will fall into the pit and die unless it moves along the rail. This includes being pushed (by another bot or a pusher) from a square to which the rail does not have an exit, regardless of the direction the pushed bot is facing at the time of the push.
Shocker (Board Element)

A bot running into a shocker will receive 1 damage.
The bot receives only 1 point of damage for moving into a shocker, regardless of the move chip played.
If a bot is pushed into a shocker by another bot or a pusher, it receives 1 point of damage. If a bot is pushed into a shocker by another bot and is killed because of the shock damage, the pushing bot is not blocked during that phase.
If a bot is carried into a shocker by a belt, the bot receives 1 point of damage for each move into the shocker. So a red belt leading into a shocker can result in 3 damage per phase.
Belt
 |
| 1-speed |
 |
| 2-speed |
 |
| 3-speed |
 |
| 5-speed |
Each phase, a belt moves any bot on it in the direction of its arrow. A bot moved onto a lower-speed belt will not be additionally moved more than the lower speed.

A turning belt rotates the bot if it is carried by a belt into one of its incoming directions. The rotation is in the same direction as the turn of the belt.
- How do different colored belts interact?
- The belts activate in sub-phases:
- a) All 5-speed belts move.
- b) All 5-speed belts move.
- c) All 3-speed and above belts move.
- d) All 2-speed and above belts move.
- e) All belts move.
- What happens if a belt would move a bot onto another object?
- If the other object is also being moved away by a belt in the same sub-phase, both move. Otherwise the bot is blocked - movement from the belt will not push another bot or break a mirror. Bots moved by belts are considered to be "sliding". See the help for Oil about what happens when a sliding bot is in oil or hits an object that is in oil.
- What happens if belts would move 2 bots to the same location in the same sub-phase?
- The bots are moved in priority order, so the later priority bot is blocked.
Pusher

Each phase, the pusher will push any bot away to the next square opposite the pusher.
Turntable


Each phase, a bot on one of these tiles is rotated 90 degrees in the direction indicated by the arrows on the turntable.
Teleporter


Teleporters activate immediately before and after weapon fire. They may be placed on the floor, perhaps with a force field on top of them. Or they may be placed on the ceiling above other elements, such as belts. A bot in a teleporter is teleported only if it moved (for any reason) since the last time teleporters activated.
Bots are teleported to another teleporter of the same color. All teleporters of a single color will operate in a single loop which is randomized at the start of each race.
If present, the green number in the upper left is this teleporter's location. The red number in the upper right is where you're going if you use this teleporter. These numbers only show up once teleporters are used.
A teleported bot becomes virtual if its destination contains a real bot.
Color Groups
Teleporters will only teleport bots to another location containing the same color teleporter... purple to purple, red to red, etc. There are always 2 or more teleporters per color in any given ship. If there are only 2 of a color of teleporter, bots will be teleported back and forth between these two locations. If there are 3 or more of a color of teleporter, bots will be teleported amongst them in a loop. The order of this loop is randomized at the beginning of the game and is unknown until bots use the transporters. See numbering below...Numbering and Auto-Mapping
Teleporters have 2 numbers associated with them. They have no numbers labeling them at the start of a game. They are automatically labeled with these numbers as they are used as the game progresses.- The Series Number will appear in the upper left corner of the teleporter square in green. It indicates which teleporter this square is in the teleporter's color group. Numbering starts at 1 at the topmost, leftmost teleporter, then continues sequentially from left to right, top to bottom, one row at a time. This number never changes from game to game, but will only display once the teleporter has been used as a destination, i.e. a bot has been teleported to this location from another teleporter of the same color.
- The Destination Number will appear in the upper right corner of the teleporter square in red. It indicates the Series Number of the teleporter to which a bot will be teleported if the bot lands on this teleporter. Desintation Numbers are randomized at the beginning of each game for teleporter groups that consist of 3 or more teleporters. In those cases where a color group contains 3 or more teleporters, this number is not known until a teleporter is used to teleport a bot away to another location.
Please be sure to verify your understanding of the teleporter auto mapping system, as misunderstandings can result in minor inconvenience or death.
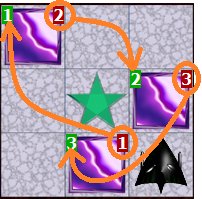 Stationary example | 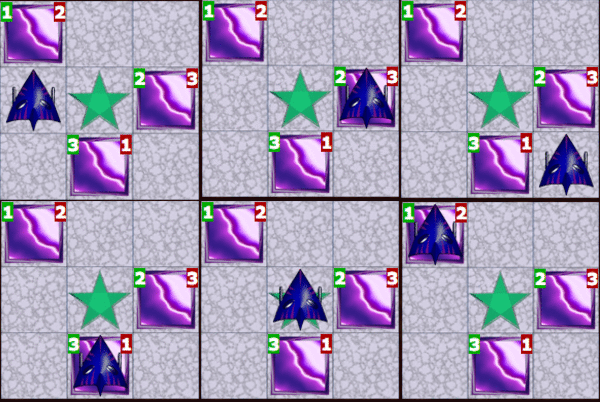 Animated example |
- What happens when a force field covers a teleporter?
- If your destination is blocked by a force field you will immediately be teleported again from each blocked teleporter until you reach one that is not blocked. Each hop will be mapped by the auto mapping system.
Check Point

To win the game, a bot must visit each check point in the numbered order. In many games, there is a force field in place over the check point which must be destroyed before visiting the check point. The order of the checkpoints can be entirely random or specified by the board's designer. A bot gets credit for visiting a check point by ending a phase on the check point. A damaged bot gets one point of damage repaired for ending a turn on a check point.
- Numbering
- The Check Point's number is indicated in the upper right corner of the check point square. The number can have different background and text colors:
Green = Your next CP
Black = Leading opponent's next CP
Blue = You can't shoot (when game option enabled)
Red = None of the above
| # | Your next CP | Leading opponent's next CP | You can shoot |
| 2 | No | No | Yes |
| 2 | Yes | No | Yes |
| 2 | Yes | Yes | Yes |
| 2 | No | Yes | Yes |
| 2 | No | Yes | No |
| 2 | No | No | No |
- Priority
- Like all elements, checkpoints operate in priority order each phase. This is important in two cases:
- If a bot and its drone are both attempting to tag successive CP's in a single phase, they must do so in priority order or only one CP will be counted.
- If the final CP is tagged by two bots in the same phase (due to a virtual bot), the bot with the first priority will be awarded the win.
Force Field


Force fields act as blocking walls (or tiles) until they are cleared by bot lasers. Every time that a non-virtual bot has a clear line of sight to an intact force field, that bot's laser (or blaster) will cause one point of damage to the force field.
Recharging Force Field
 |
| Activated Recharging Force Field |
 |
| Deactivated Recharging Force Field |
These force fields take one shot to deactivate. They will reactivate at the end of the next phase.
Inverter

Any chip executed while on this tile is reversed.
Left and Right turns are swapped. U-turns are not affected.
Move chips go in the opposite direction.
Note that the entire movement of a chip is either inverted or not. So you can move over an inverter using a 2 or 3 normally. Executing a 2 or 3 from an inverter will move backwards 2 or 3 spaces.
Here is a mapping of chips when executed from an inverter:
becomes becomes becomes becomes becomes becomes becomes
- What if the reverse module is activated on an inverter?
- The two negate each other, and the chip is executed as if there were no inverter/reverse.
- What if I use crab legs while on an invertor?
- The invertor will reverse your movement left<->right.
Doubler

Any movement from a chip executed while on this tile is doubled. Turning is unaffected.
Turbo, reverse, and crab legs are all doubled.
Movement from course elements or from being pushed is not doubled.
Mirror


Mirrors reflect shots aimed at them.
Diagonal mirrors reflect the shots 90 degrees.
Horizontal and vertical mirrors reflect shots that hit their face 180 degrees. Shots from these mirrors' sides pass by unaffected.
Virtual bots are blocked by mirrors.
Real bots break mirrors by moving onto or through them. A bot that breaks a mirror will have "Bad Luck" on its next turn.
When a bot has Bad Luck, it is likely to draw a hand without much movement available.
To be precise, to add a chip to your hand you draw two chips and keep the lower movement of the two. (3 > 2 > 1 = B > L = R = U) So you can end up with a 3, but only if you draw a pair of 3's.
- Will I target myself in a mirror?
- Yes. You will shoot your reflection in a mirror, causing normal damage to yourself.
- What if my Reflector is activated?
- You'll still take the damage even with an active reflector. The reflector will reflect the shot once, but it will hit you again and do its damage.
- What if I shoot at myself with a Blaster and the blaster kick-back takes me out of the shot's path
- You'll still be hit for the double damage. The shot is considered to be much faster - the animation is slowed down so that the action can be followed.
- Will a Bomb break a mirror?
- Yes. An exploding bomb will destroy all mirrors in the bomb's explosion area (where bots would be damaged).
- Will I get the mirror's Bad Luck if I destroy it with a bomb?
- No, you will not get Bad Luck because you didn't destroy it yourself.
- If a bot is pushed into a mirror, what happens?
- The bot pushed into the mirror breaks it, and gets the Bad Luck.
- What if my Drone breaks a mirror?
- You do not get Bad Luck if your drone breaks a mirror.
Trapdoor

This is a pit in the floor, covered by a trapdoor which is closed in the indicated phases. So it is safe to be on the trapdoor during the phases that match the numbers shown. The trapdoor opens or closes as needed at the end of a phase to prepare for the following phase.
Examples:
 Safe to cross during phases 1, 3, and 5. Safe to end phase 5 here.
 Safe to cross during phases 1, 3, and 4. Safe to end phase 3 here.
Sliding Wall

This is a wall which slides open during the phases shown on the wall.
One Way Wall

This wall allows both movement and shots in only one direction.
Wall Lasers
 |
| Lasers |
 |
| Blasters |
 |
| Repellers |
Weapons which shoot bots and other objects. They do not target force fields.
Curtain

Curtains block shots (by blocking line-of-sight) but allow bots to move through them.
Window

Windows block bots, but allow shots to pass.
Vent

Vents blow flame and hot air up from beneath the floor.
Bots ending a phase on a vent will be burned for 1 damage.
Bots moving over a vent under their own power will become airborne. Airborne bots will fly over any obstacles (such as walls, pits, and magnets, but not other bots) until movement from the current chip is completed, and will fly an extra square for each vent crossed.
When movement from the current chip is completed the bot will land. Landing in a pit or force field will result in death. Landing on a mirror will break the mirror (even if the bot is virtual!).
Note that a bot will not fly unless it moves on and off a vent with the same chip - so a 2, 3, or 1+turbo is needed to fly.
Magnet

A bot moving onto a magnet is immediately rotated to face in the magnet's direction. Once on the magnet, the bot can not rotate and can move only in the magnet's direction - if a bot is pushed sideways while on a magnet it will move in the direction the magnet points (even if there is a wall on the opposite side of the magnet). Trying to move (or be pushed) off a magnet in the opposite direction will be blocked by the magnet. Trying to move off a magnet sideways (with crab legs) will result in no movement.
Note that magnets affect bots immediately - even if the bot does not end a phase on the magnet. Any remaining forward movement from the current chip will move the bot in the magnet's direction.
Magnets do not affect flying bots.
Water

If a bot plays a chip while in water, the chip's movement is reduced to one (either forward or backward). Turbo has no effect when play with a chip used on a water tile. Water can be placed over floor elements.
Portal


Moving into a portal instantly teleports a bot to the closest portal facing the one entered. Shots can pass through only red portals.
Note that entering a portal which has no exit will result in severe damage locking all chips (or even death if the bot is rebooting).
Oil

(Bots moved onto oil from belts may not behave as expected.)
Any movement that would stop on oil continues to slide until the bot leaves the oil or is stopped by another object. A bot is not considered sliding until it would normally stop. For example, playing a 3 to move into oil would cause a bot to move 3 spaces normally, then slide if it was still in oil.
A sliding bot stops when it runs into a solid object or is no longer in oil. Sliding bots do not break mirrors or push other bots that are not in oil. If a sliding bot hits another bot that is in oil it stops and the other bot is not pushed.
Crusher
 |
| A crusher active in phases 2 and 4. |
 |
| A crusher over a belt. |
Crushers are elements on the ceiling above any tile. They crush (10 damage) any bot below them in the phases indicated by the red dots.
Virtualizer (Board Element)

Turns a bot virtual. (Unlike the virtualizer module, the virtualizer board element will not cause the bot to turn real before the end of the turn.)
Arena Remains
Remains only apply to arena games.When a bot(not drone) dies, its remains will be dropped in the 9 squares nearest the point of death.
A bot collects remains immediately when at the same location as the remains (even mid-phase or mid-chip). For each remains collected, the bot receives 1 repair and +100 battery charge.
Remains dropped in pits are lost.
Remains are affected by elements. (belts, pushers) Remains will be last in priority order.
Multiple remains at the same location at the end of a phase will be reduced to one.
Remains dropped on one or more live bots will be collected by the bot with the earliest priority.
Turn Sequence
Phase Steps
The steps of each phase are executed in the following order:- Bot modules: Virtualizer, and (phase 1:) Bombs, Drones, and Shocker
-
 Bots' Chips (affected immediately by Rails, walls, pits, etc)
 - Belts
-
 5-speed belts move 1 space
 - 5-speed belts move 1 space
-
 3-speed (red) and faster belts move 1 space
 -
 2-speed (green) and faster belts move 1 space
 -
 All belts move 1 space
-
 Pusher
 Turntable
 Teleporter (1 of 2)
 Virtualizer (element)
 Bots Fire Weapon - Live, Real bots fire their weapon if aimed at a target
 Wall lasers and blasters shoot. (In reading order starting in the top left corner.)
 Wall repellers shoot. (In reading order starting in the top left corner.)
- Teleporter (2 of 2) - Teleport bots that moved onto teleporters during weapon fire
 (Phase 5) Bombs explode
 Vent damage
 Crushers
 Screens - Screens open, killing bots resting on them
 Recharging Force Fields recharge (if they were discharged before current phase)
 Check Points are scored for any bot standing on its target CP in priority order.
 (Phase 5) Damaged bots on Repair or CP tiles are repaired.
 Bots which activated virtualizer modules this turn become real (if no other real bots present).
- (Phase 5) Virtual bots become real or take Virtual Burn.
 (Phase 5) Bots Respawn
- Check winning conditions.
Priority
Priority determines the order in which bots act in each step of a phase. A bot which is destroyed (by a pit or laser fire) before its turn to act in a step will not get an action.Priority is assigned for each turn based on the previous turn's bot movement. Bots are ordered based on their total distance moved by their own chips. The more a bot moved last turn, the earlier it will act during the current turn. Ties are broken by reversing the previous turn's priority.
In the status panel, bots are shown in priority order for the upcoming turn.
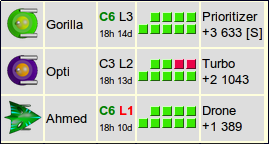 |
| Gorilla acts first with priority 1, Opti has priority 2, Ahmed priority 3 |
Bot Modules
Bot Modules are enhancements that give bots special abilities. These special abilities include fun new weapons, shiny defenses, funky movement methods, and an assortment of other spiffy enhancements.
Actions
At game creation, some or all bot modules may be enabled. Each turn, a bot can optionally perform one of three possible actions using the Module menu (located directly beneath your program tiles). If you have an installed module, it will show as "[ModName]", otherwise this menu is blank. Using a module is (the first time) a three (3) turn process.
- Install a module -- get a new module ready for use.
- The list of available modules shows the current charge cost for 1 charge as "(cost)"
- Any installed modules are replaced and any charges are discarded
- Charge the installed module -- transfer power from your bot's battery to the currently installed module.
- [+# Charge (cost)] are now choices on the Module menu
- The cost of charging a module is shown as "(cost)".
- At most 5 charges can be added to a module in a single turn.
- The cost of charging a module is subject to "The Economy" (see below).
- Activate a charged module.
- The module must have at least one charge remaining.
- Turn based modules are active for all 5 phases and the Module menu choice is [Activate]
- Phase based modules activate in the selected phase(s) and the menu choice is [Phase X] or [Phases X-Y] depending on the module
- Turret, while turn based, has its own menu choices of [Direction] or [Front & Direction]
- Some modules require specific spare tiles to operate; see the individual module description for details (such as Crab Legs).
Battery
Your bot has a battery that is used to operate the fun modules that can be installed in your bot.
- Your bot starts with 500 battery power (in Puzzle games you start with 5000 battery power)
- In Race games: the battery recharges at a rate of 50 units per turn.
- In Arena games: the battery recharges at a rate of 10 units per turn.
- Each piece of Dead Bot Remains collected adds 100 to the battery's charge.

Your current module is shown next to your bot in the status panel. The current number of charges is listed with a +# (+2 in this example), and your current battery charge is listed afterwards (250 in this example).
The Economy
The initial price of each module is based on past games on the board or, if the board is relatively new, on the overall economy across all boards.Every time a charge in a module is purchased by any bot all modules will change cost in reaction as such:
- The price for the next charge of that module is increased by 2 units for every other module available in that game.
- The price for a charge each of all other modules is reduced by 2 units each.
- If you choose to purchase multiple charges in a single turn, the price is adjusted up after each charge so that subsequent charges will cost more.
Example
- Suppose that a game has 3 modules: Turbo, Shields, and Repairs.
- The current price for a charge of Turbo is 250, Shields cost 200 and Repairs cost 150.
- You have 600 units of charge available and Turbo installed, so you purchase 2 charges of Turbo.
- The first charge will cost 250. After that charge happens, the price for Turbo will increase by 4 (2xCount of other modules) while the cost for all others will reduce by 2 each.
- The 2nd charge for Turbos will cost an additional 254, so 504 total.
- After that 2nd charge, the new costs will be Turbos 258, Shields 196, Repairs 146.
Blaster
All of your normal laser shots are replaced with larger blaster shots for one turn. Shots fired do 2 points of damage to bots (but still only 1 point to force fields). You are pushed backward 1 space each time you fire your blaster.Bomb
Drop a bomb at your location at the start of the current turn. The bomb explodes at the end of the current turn, dealing 9 damage to any bot at the bomb's location and 2 damage point to all bots in the 8 tiles around the bomb. Bombs are virtual, and are affected by elements which affect virtual bots (belts, pushers, teleporters, etc), except that they do not slide on oil. If a bomb takes any damage (for example, from a vent or by riding a belt into a shocker) the bomb is destroyed without exploding.Clamp
Phase based. You cannot move or be moved, except by a belt. You WILL rotate normally if you play a turn card and clamp on that phase.Note that if you activate clamps while playing a rotate on a rail, your rotate will be changed to a move-1 by the rail and the clamp will prevent your movement.
Crab Legs
Phase based. An unplayed move chip is required to activate this module.Changes Right or Left chips into sideways move-1's.
- What if I use crab legs while on a rail?
- Your sideways move will be blocked by the rail.
- What if I use crab legs while on an invertor?
- The invertor will reverse your movement left<->right.
Drone
When the drone module is activated, you deploy a virtual drone at your current location. The drone is deployed facing the opposite direction as you. The drone is given the latest priority at the time of creation.The drone acts as a normal bot except that it does not shoot or get repaired. The drone may tag checkpoints for you. The drone plays the same chips as you each turn until it is destroyed or you deploy a new drone. Modules do not affect the drone, so it always plays the five chip program as displayed when you submit your turn.
If you and your drone attempt to tag successive CP's in the same phase, you will tag in priority order. If your priority is not in the correct order, only one CP will be counted for the phase.
If you lose a life in the middle of a turn your drone continues to execute the remainder of the chips that you programmed for that turn. Your drone can still tag check points after you lose your last life until the game ends.
Prioritizer
You can choose to act either before or after bots without an active prioritizerIf two or more bots activate a prioritizer in the same fashion (either both first or both last):
- These bots will act, with regards to each other, in original priority order.
- These bots will all act either before (first) or after (last) all other bots without an active prioritizer.
Effectively, this makes the overall priority order:
- All bots with an active prioritizer, selected for "First", move in order of their original priority.
- All bots with no active prioritizer move.
- All bots with an active prioritizer, selected for "Last", move in order of their original priority.
Repair
At the end of turn, 1 damage point is repaired.Repeller
Phase based - two consecutive phases. Instead of firing your normal laser for the turn, you fire your repeller during the 2 selected phases. Bots hit by the repeller are pushed 1 space. The repeller will not fire at force fields, but will be reflected by mirrors.- When I use my repeller, does my normal laser fire in the phases that the repeller does not?
- No. Activating your repeller disables your normal lasers for the full turn.
- Does a bot hit by a repeller take a point of damage?
- No.
- Does a bot sitting on a magnet not pointing away from me get pushed back when I use my repeller?
- No.
Reflector
Phase based - two consecutive phases. Reflects shots (including blaster and repeller) back to hit the shooter. If the shooter has an active reflector, it will '''not''' reflect the shot again.Reverse
Phase based. The chip in the selected phase is reversed. Left and Right turns are swapped. Move chips go in the opposite direction.Scanner
Scans opponents' chips. You can see all opponents' chips for the current turn, but not their play order. Chips are displayed in the status panel. Once you have activated the scanner, a charge will be deducted during the next turn - but you can rescan during the current turn at no additional cost.Shield
No damage is taken from incoming shots. You do not fire your weapon, whether it be at another bot or at a force field.Shocker (Module)
When a bot with an active shocker contacts another bot the other bot takes 1 point of damage. A shocker module can not do more than 1 point of damage to a single bot during a single phase.Shocking takes place the moment two bots touch. If a bot is shocked to death it won't push or block.
Storage
Allows you to store an unplayed chip for future use. When the storage option is activated, the chip in the first position of your unused chips is what will be stored. The stored chip is kept until you use it, even if you change to another module. Once stored, the chip is available in the options drop-down.You can only store one chip at a time. If you activate your storage module while you have a chip stored, your stored chip will be replaced.
Turbo
Phase based. Moves forward 1 after a move chip is executed. (One forward move, even after a reverse chip) An unplayed move chip is required to activate this module.For tournaments the settings generally are Move: 3 days, Game: 15 days. Each time you submit a turn, your Move-Time will be increased as follows: Vacations: If you'll be unable to move for a week or more, it's a good idea to set vacation dates in your profile. This will let other players know when to expect you back.Turret
You can aim your laser right, left, or back instead of, or in addition to, forward.Virtualizer
Phase based. Turns you virtual at the start of the phase where it is activated. Turns you real at the end of the same phase, or any later phase of the turn, if at a location with no other real bots.Time Limits
Games are created with two timers for each player: A Move Timer, and a Game Timer. The Move Timer reloads when moves are made. The Game Timer only decreases after the Move Timer runs out. When a player's Game Timer runs out the player may be ejected from the game by another player.All three bots have 18 hours of Move-Time. Gorilla, Opti, and Ahmed have 14, 13, and 10 days of Game-Time, respectively. Chat Commands
You can enter these commands in the chat box of any game.